
Last weekend, we went to the Fort Worth Stock Show & Rodeo. Now, I'm a little embarrassed to admit that I've lived in Texas for over 5 years and Fort Worth for 2 1/2 years and this was my first time to go. But - I'm a little less embarrassed because Jeremy has lived here his entire life and has never been.
To sum it up in one sentence: we had a blast.
Jeremy's youngest sister, Olivia, came to Fort Worth for the first time and went with us. We didn't get the full experience because it was freezing, but I'm pretty sure the only stuff they have outside are the rides, and we weren't that interested in those.
The first area we walked through was the shopping building where everyone has their different booths and gives away pens or tries to sell you stuff. Jacob spotted the John Deere within about .04 seconds. Two things Jacob loves: diggers and John Deere.
He was in heaven.


 Once we got through that building, we had some lunch (I had a corn dog because I always have corn dogs at fair-type events) and then ventured through all of the livestock. I took random pictures of the pretty cows and strange looking brahmans and what not, but I figure I won't bore you.
Between two of the buildings, what did we find? More John Deere! This kid cracks me up.
 He even found a cow that he could pet.
 All four of us had an absolute blast. We walked around discussing how much we would love to have a ranch, what we would name it, how it would work, etc.
It's one of Jeremy's and mine goals. That would be the life, if you ask us.
So, if you live in the area, or are in the are between now and February 5th, check out the Stock Show. It's a fun time for all.
Also, with your admission, you get free admission to various museums in Fort Worth. We're going to be taking Jacob to the Museum of Science and History this weekend, which we're all pretty excited about.
To sum it up in one sentence: we had a blast.
Jeremy's youngest sister, Olivia, came to Fort Worth for the first time and went with us. We didn't get the full experience because it was freezing, but I'm pretty sure the only stuff they have outside are the rides, and we weren't that interested in those.
The first area we walked through was the shopping building where everyone has their different booths and gives away pens or tries to sell you stuff. Jacob spotted the John Deere within about .04 seconds. Two things Jacob loves: diggers and John Deere.
He was in heaven.


 Once we got through that building, we had some lunch (I had a corn dog because I always have corn dogs at fair-type events) and then ventured through all of the livestock. I took random pictures of the pretty cows and strange looking brahmans and what not, but I figure I won't bore you.
Between two of the buildings, what did we find? More John Deere! This kid cracks me up.
 He even found a cow that he could pet.
 All four of us had an absolute blast. We walked around discussing how much we would love to have a ranch, what we would name it, how it would work, etc.
It's one of Jeremy's and mine goals. That would be the life, if you ask us.
So, if you live in the area, or are in the are between now and February 5th, check out the Stock Show. It's a fun time for all.
Also, with your admission, you get free admission to various museums in Fort Worth. We're going to be taking Jacob to the Museum of Science and History this weekend, which we're all pretty excited about.




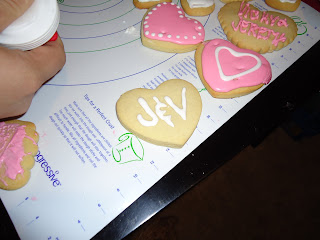


 So, that's my experience so far. I have lots to learn, but I'm proud of what I've accomplished thus far on my own. One of the main things I have learned is to use the disposable pastry bags. If you'll see from the pink/white batch, I'm using containers... it was just too difficult to guess when the icing would come out, when you'd get an air bubble, etc. Also, the bags can be thrown away and the containers were nearly impossible to get clean. I got the 100-pack of bags for $20 and used a 40% off coupon from their web site. Also, on the pink/purple batch, I'm using the Americolor food coloring that nearly every blog suggests, which I found at Hobby Lobby.


 It. Was. DELICIOUS.
 We happened to have some people over the night I did it, so everyone tried it and loved it.


 So far, we've used it for grilled cheeses and cinnamon toast (which I'll be blogging about soon) and it was absolutely fantastic both times. It can also be frozen for a few months, which is always a plus.


 A disaster!


 Lastly, we've got the pantry. It was a disaster.


 The entire pantry is so much better now.